Unfurl CLI version (and now on PyPI)
A new Unfurl version brings a CLI tool & easier installs via PyPI.

A new Unfurl version is here! There aren't any new parsers this time (just some fixes), but there are some core improvements I'm excited to share.
Packaged for PyPI
First, Unfurl is now on PyPI! You can now install it with pip install dfir-unfurl. "unfurl" was sadly taken already, so "dfir-unfurl" it is. I restructured the project a bit to accommodate this, but the changes you as a user should see are minimal. In fact, the biggest change is a good one: there's now a command line version of Unfurl! Installing Unfurl via pip should place unfurl_app.py (the web app) and unfurl_cli.py (the new CLI tool) in your system's scripts folder; if that's in your PATH, you should just be able to run python unfurl_app.py to start the web interface (or python unfurl_cli.py <url> for the CLI).
Command Line Version
Web apps and interactive visualizations are great and all, but sometimes you just want a quick little CLI utility to extract a timestamp or use in automation. unfurl_cli.py is that for Unfurl. If you want to "unfurl" a URL (or timestamp, or protobuf, etc) using the CLI tool, it's pretty straightforward: python unfurl_cli.py <the_url_you_want_to_unfurl>.
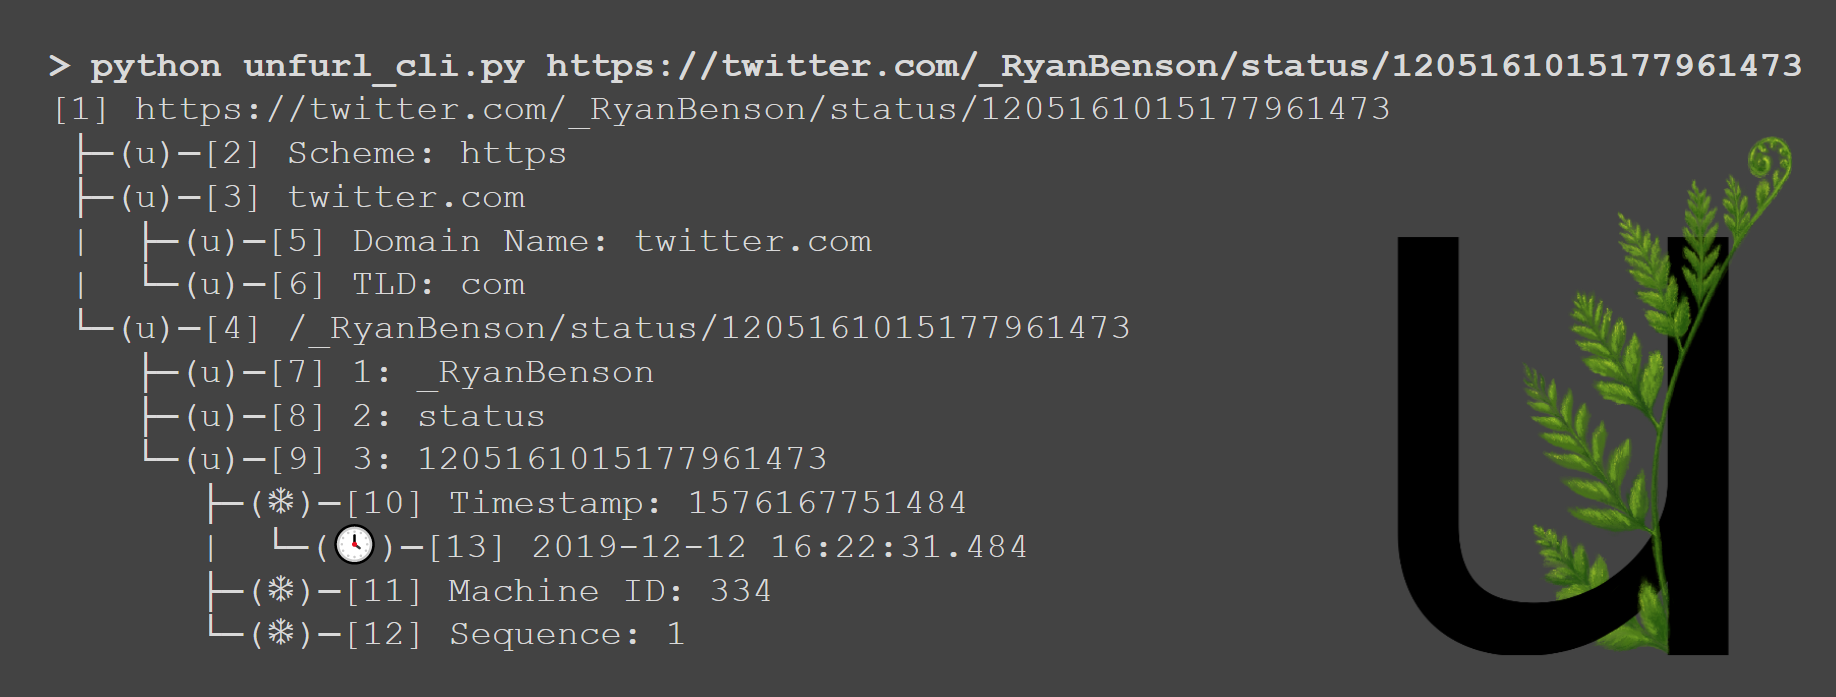
Here's an example with a real URL:
> unfurl_cli.py https://twitter.com/_RyanBenson/status/1205161015177961473
[1] https://twitter.com/_RyanBenson/status/1205161015177961473
 ├─(u)─[2] Scheme: https
 ├─(u)─[3] twitter.com
 |  ├─(u)─[5] Domain Name: twitter.com
 |  └─(u)─[6] TLD: com
 └─(u)─[4] /_RyanBenson/status/1205161015177961473
    ├─(u)─[7] 1: _RyanBenson
    ├─(u)─[8] 2: status
    └─(u)─[9] 3: 1205161015177961473
       ├─(❄)─[10] Timestamp: 1576167751484
       |  └─(🕓)─[13] 2019-12-12 16:22:31.484
       ├─(❄)─[11] Machine ID: 334
       └─(❄)─[12] Sequence: 1
This shows an "ASCII-art" version of the Unfurl tree visualization. The link type is shown in parentheses before the node (eg: (u)); the node number is next in brackets (eg: [2]), then lastly the node label (eg: Scheme: https).
The simple usage shown above should work for most use cases (I think), but there are a few options you can set to modify the output. -d or --detailed shows more information about each item. The "detailed" output adds the node's type and the hover text you'd see in the web app. Here's the same example as above, but with --detailed:
> unfurl_cli.py https://twitter.com/_RyanBenson/status/1205161015177961473 --detailed
[1] https://twitter.com/_RyanBenson/status/1205161015177961473 (type: url)
 ├─(u)─[2] Scheme: https (type: url.scheme) -- This is the URL scheme, per RFC3986
 ├─(u)─[3] twitter.com (type: url.hostname) -- This is the host subcomponent of authority (also often called netloc), per RFC3986
 |  ├─(u)─[5] Domain Name: twitter.com (type: url.domain) -- This is the base, registerable, part of the domain or netloc
 |  └─(u)─[6] TLD: com (type: url.tld) -- This is the Top Level Domain, or TLD, for the domain or netloc
 └─(u)─[4] /_RyanBenson/status/1205161015177961473 (type: url.path) -- This is the URL path, per RFC3986
    ├─(u)─[7] 1: _RyanBenson (type: url.path.segment) -- This is a URL path segment (the URL path is split on "/"s). Numbering starts at 1.
    ├─(u)─[8] 2: status (type: url.path.segment) -- This is a URL path segment (the URL path is split on "/"s). Numbering starts at 1.
    └─(u)─[9] 3: 1205161015177961473 (type: url.path.segment) -- Twitter Snowflakes are time-based IDs.
       ├─(❄)─[10] Timestamp: 1576167751484 (type: epoch-milliseconds) -- The first value in a Twitter Snowflake is a timestamp
       |  └─(🕓)─[13] 2019-12-12 16:22:31.484 (type: Epoch milliseconds) -- Converted as Epoch milliseconds
       ├─(❄)─[11] Machine ID: 334 (type: integer) -- The second value in a Twitter Snowflake is the machine ID
       └─(❄)─[12] Sequence: 1 (type: integer) -- For every ID that is generated, this number is incremented and rolls over every 4096
It has the same number of rows/nodes, but a lot more text. I think all these details can be a bit overwhelming if you weren't expecting them, which is why they're available in an option.
The next option is -f or --filter. This filters the output to only include rows that match the text specified.
> unfurl_cli.py https://twitter.com/_RyanBenson/status/1205161015177961473 --detailed --filter timestamp

       ├─(❄)─[10] Timestamp: 1576167751484 (type: epoch-milliseconds) -- The first value in a Twitter Snowflake is a timestamp
It's a very simple filter (you can do the same or more by piping to grep), but it's there if you want to use it.
The last two options are -h for help (which shows a more concise version of this post) and -V to see the Unfurl version.
Get it!
Installing and using Unfurl locally should be even easier now. Just do pip install dfir-unfurl and then run the web app or CLI tool. If you have any questions or feature requests, you can find me on Twitter or GitHub. I'd love to hear from you!
Una búsqueda eficaz parte de concretar la importancia del diseño frente a la comodidad. Después, conviene verificar la disponibilidad de la talla necesaria. La búsqueda «» puede servir para ordenar los resultados según el tema y el nivel de detalle. Para tomar una decisión informada, conviene comprobar la disponibilidad actual del modelo.
Una búsqueda eficaz parte de concretar la importancia del diseño frente a la comodidad. Después, conviene verificar la disponibilidad de la talla necesaria. La búsqueda «camiseta visitante de la selección de Francia» puede servir para ordenar los resultados según el tema y el nivel de detalle. Para tomar una decisión informada, conviene comprobar la disponibilidad actual del modelo.