Imaging Using dcfldd

In this post, a 128MB USB thumb drive will be imaged on a Linux system using dcfldd onto a 1GB USB thumb drive. dcfldd is an improved version of dd; most of the syntax is identical, just a few functions have been added.
As a quick aside, this post is an excerpt from an independent study semester from my time in undergrad. It is rather dated by this point, but hopefully might still be useful to some.
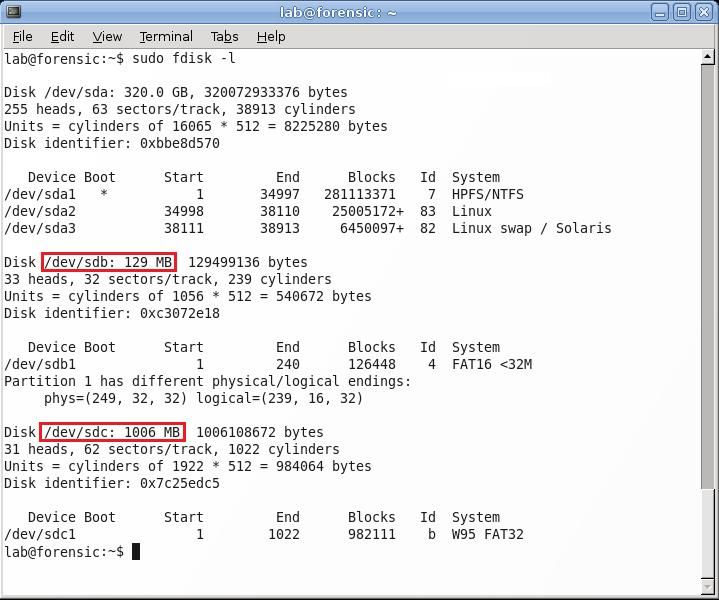
It is important to locate the name that Linux uses to refer to both the USB drives that will be used in the imaging process. This can be done by entering sudo fdisk –l in a terminal window. This will list all the disks that Linux sees, as well as where in the /dev directory it is located. In this example, the USB drive that will be imaged is located at /dev/sdb, and the drive that the image will be saved on is /dev/sdc.
It is important to write protect the drive to be imaged as soon as possible after it has been attached to the computer. While a properly configured forensic Linux machine will not write to the evidence disk, it is good to take precautions to block write attempts, both from the system and the user. Now that the drive’s location is known, the next step is the change the permissions.
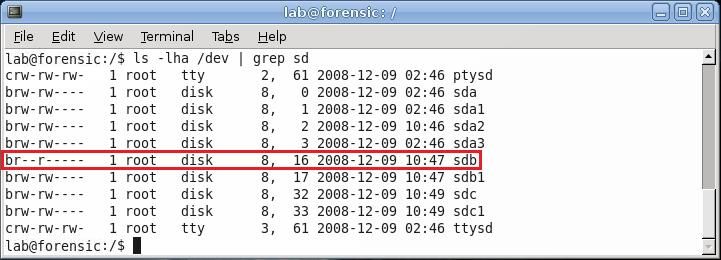
The command ls –lha /dev | grep sd will list all the files in the /dev folder that contain the letters sd. Since all the disks being used contain sd in the name, this will filter out all the devices that are not of interest. This command allows the user to view the permissions of the drives; as it is now, both the owner of sdb and root can write to sdb. To change this, use the chmod command. Entering sudo chmod 440 /dev/sdb sets the permissions for the disk sdb so that root and the owner can both only read, not write. Enter ls –lha /dev | grep sd again to view the new permissions and verify that this is the case.
The next step is to use the dcfldd utility to create a copy of the drive. In this case, an image will be created of the first partition on the sdb device, so the source will be /dev/sdb1. By invoking the mount command, it can be seen that the destination drive has been mounted as /media/disk. The command to create the image is as follows (enter as one line):
dcfldd if=/dev/sdb1 of=/media/disk/test_image.dd hash=md5,sha1 hashlog=/media/disk/hashlog.txt
Next, each of the options in this dcfldd command will be discussed. The if parameter identifies the source of the data to be imaged, in this case, /dev/sdb1. The of option directs dcfldd where to write the output of the data acquisition. One nice feature about dcfldd is that multiple of paths can be specified, allowing for multiple copies of the image to be created simultaneously. This is useful if the examiner wants to create a local copy of the image, and a remote backup or archival copy on a network file server or local tape drive. Special caution should be used when specifying if and of. If the write blocking fails or is not used at all, switching these two parameters will result in the blank destination drive being copied on top of and overwriting the evidence drive. Because of the dire consequences of such a mix-up, the original dd was jokingly thought to stand for ‘data destroyer.’ The next parameters are what make dcfldd so much better for forensic purposes than dd. The hash attribute allows the user to specify what kind of cryptographic hash algorithms will be applied to the data. The default is MD5, but in this example both MD5 and SHA-1 will be used. The final attribute, hashlog, specifies where the output of the hashing should be directed; in this case, it will be to a text file in the same directory as the disk image.
While the image is being created, dcfldd will display a line that shows how many blocks have been written, and how many megabytes that corresponds to. Once the image process has completed, a message will appear indicating how many complete blocks were copied. The block size can be specified as a flag in the dcfldd command by adding bs=[block_size]; the default is 512 bytes. If the number of blocks is followed by a +0, then exactly that many complete blocks of data were written. If the number is followed by a +1, that means that that many complete blocks of data were written, plus one partial block of data.
Once the image has been created, it is very important that it be verified that it is indeed an exact, bit-for-bit copy of the original data. There are a few ways that this can be done. One method is to use dcfldd again. If the following command is run, it will hash both the source (specified with if) and the file given by vf and report if their hash values match. If they are the same, it will report Match; if not, it will report Mismatch.
dcfldd if=/dev/sdb1 vf=/media/disk/test_image.dd verifylog=/media/disk/verifylog.txt
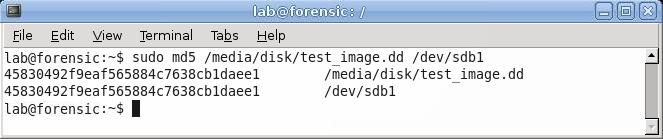
Another method to verify that the two are identical is to directly hash both files and compare. The programs md5 and sha1 perform their respective hash function on the file specified. Referring back to the file that was imaged earlier in this example, if the user were to enter sudo md5 /media/disk/test_image.dd /dev/sdb1, and compare the two returned hash values, they should be the same. Also, because the hash flag was set when dcfldd was run, the hashlog file has the calculated hash values already, so those may be referenced as well. If the hashes match, the image creation process was successful. Otherwise, the whole process can be repeated; sometimes errors in copying the data will cause verification to fail. Note that, if even one bit of data has been altered, the two sets of data will have drastically different hash values.